I've built a fair few PCs, including several small form factor builds, but never have I done an all-in-one thin PC (think iMac design). With the Thin-Mini-ITX standard, it's now possible to build your own!
I just went through this build process over at Tom's Hardware and I find it extremely interesting. Check it out for yourself!
http://www.tomshardware.com/picturestory/604-do-it-yourself-all-in-one-thin-mini-itx.html
Showing posts with label hardware. Show all posts
Showing posts with label hardware. Show all posts
Thursday, 20 September 2012
Saturday, 28 January 2012
Evolution of a PC Enthusiast's Addiction Part 2 - Water Cooling
 So, I left off with a very expensive hobby that I was very happy with, except for the silly backwards cooling scenario I was forced into.
 Naturally, I began looking into new CPU coolers that would be able to clear my RAM heatsinks, but no matter what it seemed like a gamble and I didn't want to be returning multiple CPU coolers and wasting a lot of time. That's when I began to contemplate water cooling. I always thought it was pretty cool (aka "hardcore") to have a water cooled rig, but also it seemed a little pointless given how effective most air coolers are these days.
 Never the less, I searched and found a seemingly really great solution: Swiftech Edge 220 water cooling kit! It's basically a 120x2 radiator (MCR 220 QP) with a small resevoir on top and an MCP 35x pump on the bottom, plus an Apogee XTL CPU block, hoses, fans, and a rad box for mounting externally. Regular price on this was around $300, but I found it on sale for $210. I also added a Silverstone Air Penetrator fan to cool my GPUs better, some blue tubing, and a Scythe Kaze Master Pro 6 channel fan controller. Total: $333.62. Not bad, really.
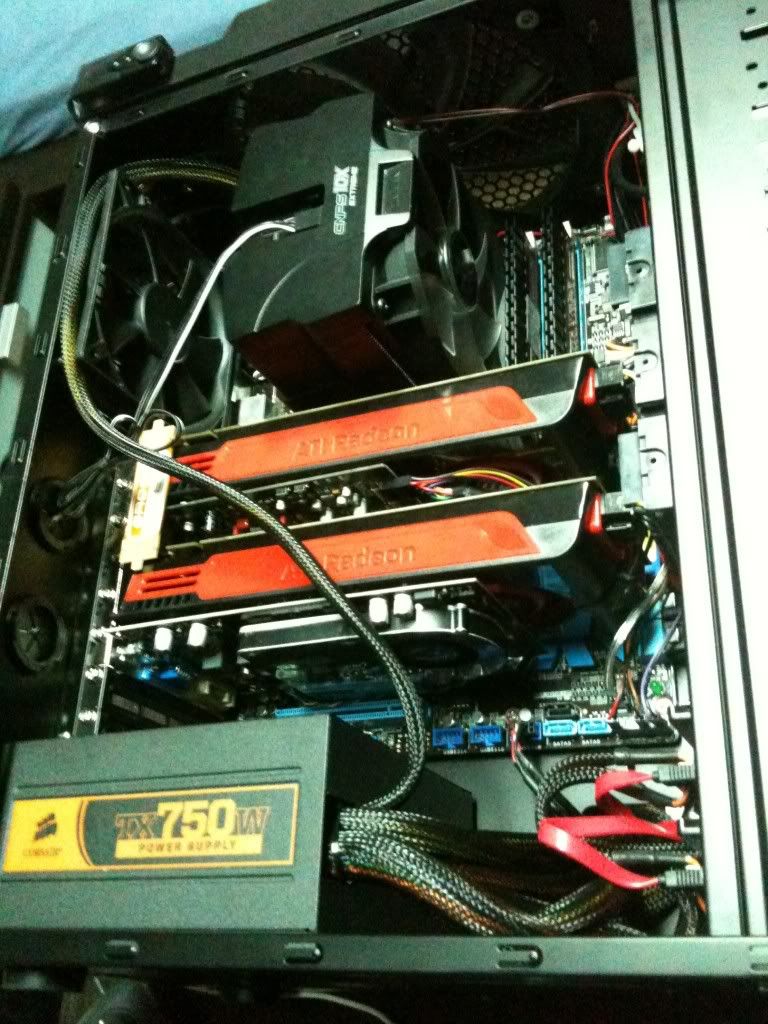
 Installation was actually quite easy. I just assembled everything and used the rad box to mount it off the back of my case. The loop didn't have any leaks, so I plugged everything in and booted her up. The great thing about water cooling is how quiet it is. I run my fans at low speeds (1300rpm) and the cooling performance is better than ever. My temperatures dropped around 10C under load! This is with a nice overclock, though, at 4ghz 1.32V.
Naturally I was happy again. I was able to put all my fans the proper way again (front to back), my cooling was better, my PC was quiet. Even my GPUs were cooled better by having the Air Penetrator blowing at them - you can see the fan just to the right of the GPUs in the center bay.
 This is actually pretty much the end of my purchasing. In one of my first posts I mentioned trying Eyefinity, so there's that, but I backed out of it and returned everything. Eyefinity is cool but not really worth the investment and performance hit for me.
I did purchase myself a bit of a Christmas gift, though, in the form of a Corsair Force Series GT 120gb SSD which I use as my gaming drive. It was $80 off, so can't complain about that. I also got rid of the Logitech mouse and keyboard; I picked up a Microsoft Sidewinder X6 keyboard and a Cooler Master Sentinel Z3RO-G mouse. They are awesome - great feel, response, and programmable.
Having the radiator mounted off the back of the case isn't a bad thing, but I got a bit of the modding bug in me and decided I had to try and install the radiator internally. Keeping in mind I use an Antec 900 II case, which is a mid tower, and the fact that my radiator is much larger than normal because of the pump and reservoir on it, I knew it wouldn't be easy.
I started by stripping out my HDD bays and test mounting the radiator in the front. It fit find, except that it was so tall I couldn't use my DVD drive anymore. Besides that, though, I just had to figure out where to mount my HDDs and SSDs. Eventually I came to an interesting solution. I was able to mount my HDDs on the side panel of the drive bays, and my SSDs on the floor of the case. A little use of a dremel later, it was all done.
I've now planned out what I need for putting my GPUs on water as well, and it will be around $300 for that. Just need to decide if I want a 3x120 rad hanging off the back, or a 200x200 radiator sitting on top like a chimney.
Well, that's my story about how my PC hobby as evolved over the last two years. Hope you enjoyed.

Friday, 27 January 2012
3D Gaming, Nvidia 3D Vision 2 vs AMD HD3D
3D gaming is often touted as a gimmick, much like it is with movies. I don't know about you, but personally, I like 3D movies - when they are well done.
Nvidia has had 3D capabilites with their 3D Vision technology for some time now, but only recently released 3D Vision 2 with a few improvements. AMD on the other hand is fairly new to the 3D world, and their HD3D technology is actually only natively supported in 3 or 4 games right now including Dirt 3 and Deus Ex Human Revolution. For every other game, it actually needs to rely on third party drivers in the form of IZ3D and Tridef 3D.
Because Nvidia uses a more closed system for their 3D tech, they are able to keep tight control over how it all works and as such it seems to generally work better and in more games than HD3D. The downside, though, is that the 3D kits (3D Vision certified monitor and glasses) are quite expensive. AMD's more open 3D platform has the benefit in being able to use just about any 3D monitor and compatible glasses, many of which are from Samsung. They can be bought for fairly cheap too, as little as $350. The downside, of course, is that besides the few native HD3D games out there, how well it works relies on 3rd parties.
Now for the specifics, I'm going to have to direct you to a couple of articles. In TechReport.com's recent PC gaming in 3D stereo: 3D Vision 2 vs. HD3D, they cover everything from specifics about each 3D technology, supported hardware, and how to set it up as well as some benchmarks about the impact on performance. The only negative to this article is that they cover only a few games.
For another look at supported games and benchmarks, you'll want to check out Tomshardware.com's Stereo Shoot-Out: Nvidia's New 3D Vision 2 Vs. AMD's HD3D. This article covers many similar aspects to TechReport's, but has more games covered.
Tomshardware.com also posted an article that is a fantastic look at compatibility with 18 popular games, Nvidia 3D Vision Vs. AMD HD3D: 18 Games, Evaluated. The absolute coolest part about this is the images that let you see the 3D effect for yourself. Like this one:
It seems that generally the consensus is this: the technology still has a ways to go before it is really good, but, if you need it now then you'd be better off with Nvidia 3D Vision 2 and buying a very nice monitor with LightBoost.
Nvidia has had 3D capabilites with their 3D Vision technology for some time now, but only recently released 3D Vision 2 with a few improvements. AMD on the other hand is fairly new to the 3D world, and their HD3D technology is actually only natively supported in 3 or 4 games right now including Dirt 3 and Deus Ex Human Revolution. For every other game, it actually needs to rely on third party drivers in the form of IZ3D and Tridef 3D.
Because Nvidia uses a more closed system for their 3D tech, they are able to keep tight control over how it all works and as such it seems to generally work better and in more games than HD3D. The downside, though, is that the 3D kits (3D Vision certified monitor and glasses) are quite expensive. AMD's more open 3D platform has the benefit in being able to use just about any 3D monitor and compatible glasses, many of which are from Samsung. They can be bought for fairly cheap too, as little as $350. The downside, of course, is that besides the few native HD3D games out there, how well it works relies on 3rd parties.
Now for the specifics, I'm going to have to direct you to a couple of articles. In TechReport.com's recent PC gaming in 3D stereo: 3D Vision 2 vs. HD3D, they cover everything from specifics about each 3D technology, supported hardware, and how to set it up as well as some benchmarks about the impact on performance. The only negative to this article is that they cover only a few games.
For another look at supported games and benchmarks, you'll want to check out Tomshardware.com's Stereo Shoot-Out: Nvidia's New 3D Vision 2 Vs. AMD's HD3D. This article covers many similar aspects to TechReport's, but has more games covered.
Tomshardware.com also posted an article that is a fantastic look at compatibility with 18 popular games, Nvidia 3D Vision Vs. AMD HD3D: 18 Games, Evaluated. The absolute coolest part about this is the images that let you see the 3D effect for yourself. Like this one:
 |
| Cross your eyes until there is a single central image, then wait for your eyes to focus on it. |
Thursday, 26 January 2012
The Evolution of a PC Enthusiast's Addiction
 I've had this gaming PC for 1 year and 9 months as of writing this post. My previous PC was a "prebuilt" from a local PC store. Not a Dell or a Gateway, but just a PC computer package with a Core 2 Duo (2.4ghz) and an 8600GT. One hot day I was playing DiRT in the living room, hooked up to my parent's big TV with my Logitech MOMO racing wheel and all of a sudden, the game got all glitchy and froze up. Rebooting gave me wierd visual artifacts even in the BIOS screen. Short of it was: burnt out GPU. I later opened it up and found a nice dust collection clogging the heat sink. Woops. Learned not to do that again.
In the meantime of not having a gaming PC for, oh, a year or two, I did plenty of other things. For my gaming fix, I had a Gamecube and eventually a Wii that I never played. I finally finished school and got a job, so I bought a PS3 Slim when those were released, and about 7 months later I put together a $1000 budget for a new gaming PC. I determined that I would build it myself. I researched parts, benchmarks, power, cooling, cases - everything. I sold my old PC to my parents for a small sum, and then picked up all the fancy new hardware for my awesome gaming rig.
I purchased the following on the 15th of April 2010:
 Motherboard: MSI P55GD65
Cooler: Zalman CNPS10X Extreme
RAM: Patriot Viper II Sector 5 2x2gb
GPU: Sapphire Radeon 5850 (Dirt 2 edition/reference model)
HDD: Seagate 7200.12 RPM 500GB (x2 for RAID 0)
PSU: Corsair 750TX
Case: Antec 900 II
OS: Windows 7 64 bit
Monitor: Samsung 2494SW
Periphs: Logitech Easycall wireless keyboard and mouse (bad choice)
All in all this cost me $1599.83 (minus what I got for my old one)


Now, it isn't that I was reckless. I was keeping things within Intel specs. I wasn't letting temperatures run wild. However, only a month after my initial purchase, my PC blew up while trying to push maybe 4.1 or 4.2ghz. I had purchased the product replacement plans from the store, so I had to bring the computer in and after about a week they came back to me with the news: dead motherboard.
I suppose I was exceedingly lucky. They were able to POST a few times and saw the remenants of my overclock, so it was iffy whether I would get it replaced or not. However, they pulled through for me and not only gave me a replacement, but technically an upgrade to an Asus P7P55D Pro! I couldn't have been happier about that, and to this day am thoroughly pleased with the motherboard.
 |
| 5850s, Bravura, GT240 |
The next day I bought my second 5850.
2 weeks later I bought a GT 240 for PhysX.
Obviously at this point I was not just "into" PCs, I was full out addicted. And loving it! I was crushing games, tweaking everything, soaking it all up. By the way, I don't really recommend getting a dedicated PhysX GPU because so few games support it. Though, it only cost me $65 after rebate, so I'm happy.
What came next was aftermarket GPU coolers. The reference coolers were either quiet and mediocre, or loud and effective. The problem with buying aftermarket coolers, though, is that they are almost all 2 slots big, meaning the cards would occupy 3 slots each. As you can see, I was tight on space.
 In the end there was 2 options for me: Zalman VF3000 or Scythe Setsugen coolers. And only the Scythe's were in stock. Honestly, though, I still use them and they are fantastic. I have made sure to have good air flow over them, and at 1300rpm they are whisper quiet and my GPUs don't even hit 70C with the overclock (stock volts, up from 700/1000 to 870/1200). Installing them was a bit of a pain, though. In particular the VRM and VRAM heat sinks that stick on. While gaming one fell off and broke the fan blades on the cooler! Fortunately, once again, it was a quick swap for a new one thanks to the replacement plan at the store. I also picked up some Thermal Adhesive to keep those suckers in place.
There was another issue, though. The stock VRM heat sink was extremely tiny and inadequete. It was basically 4mm wide, and extended only just long enough to cover the VRMs. The VRM temps were shooting up far higher and faster than the core or VRAM temps so I had to do something. I ended up using the spare parts to fabricate my own VRM heatsink - a copper base plate meant for the GPU core plus an extra heat sink. Works like a charm.

Now, at this point I was living in an appartment with my girlfriend, and my sound system was becoming an issue. Both because she didn't want to hear loud explosions when I gamed, and my neighbour below us didn't either. This led to me investigating headphones. I didn't want to spend much, so I tried out the SteelSeries 5H V2s... and they sucked. A lot. The sound has no bass and amplified treble, and I couldn't stand it. I decided I had to step up, and got Sennheiser PC 350s which are fan-freaking-tastic! I also swung a great deal, and got them for $150 because another retailer online had them on sale and my trusty local store price matched.
At this point, I was very happy with my system and managed to go a whole 9 days before buying another part. I was probably premature in jumping into this, but I picked up an Intel X25-M 80gb SSD for $215. Money not very well spent, to be honest. It's not that I dislike the SSD - I love it! But the problem is simply that my performance was great anyway and SSD prices were dropping. Regardless, at the time I was super happy with it and to this day I think an SSD is vital to any high end build.
Now I was running an i5 750 at 4ghz, a pair of 5850s overclocked to almost 5870 performance, an SSD, a sound card, a PhysX card, 8gb of RAM... everything was good. I was happy with the performance and the looks. Everything. Everything except the backwards cooling solution.
I'll save the rest for my next post.
Tuesday, 24 January 2012
Cosmos II: The Biggest, Baddest Case
 |
| Cooler Master Cosmos II |
The case is actually so large, standing at 13.5" x 27.7" x 26.1", that CM created a new term for it: the Ultra-Tower.
Links
Official
(flash) http://www.coolermaster.com/microsite/cosmos_ii/
(non flash) http://www.coolermaster.com/product.php?product_id=6792
Reviews
http://www.anandtech.com/show/5451/cooler-master-cosmos-ii-large-and-in-charge
http://www.hardwarecanucks.com/forum/hardware-canucks-reviews/50006-cooler-master-cosmos-ii-ultra-tower-case-review.html
http://www.guru3d.com/article/cooler-master-cosmos-ii-review/1
Generally speaking, besides a rich enthusiast who just wants to spend a lot of money, this case has a lot of potential for the water cooling community. Water cooling can take up a very large amount of space, so unless you want to have radiators hanging off the back of your case, you need to go big. Really big.
 |
| Corsair Obsidian 800D |
Official site: http://www.corsair.com/pc-cases/obsidian-series-pc-case/obsidian-series-800d.html
Review: http://www.guru3d.com/article/corsair-obsidian-800d-review-test/
 |
| Silverstone Temjin TJ07 |
Official site: http://www.silverstonetek.com/product.php?pid=92&area=en
Review: http://www.techpowerup.com/reviews/Silverstone/Temjin_TJ07/
http://www.silentpcreview.com/Silverstone_TJ07
Wednesday, 18 January 2012
X-RANGERS: Defenders of Gaming
XFX 7970 advertisement. Hugely corny and silly, but also probably one of the funniest things I've watched on YouTube in a while. Definitely didn't expect to see something like this. It's probably funnier if you watched Power Rangers as a kid.
Graphics Card Overclocking
Overclocking a graphics card is a great way to unlock higher framerates. In many cases, you are able to increase the performance of a GPU to that of the next better model. For example, AMD 6950 uses, basically, the same hardware as the 6970, just with a couple parts on the GPU core disabled and it's at lower clocks. Well, if the hardware is the same then it should be able to hit the same clocks as the 6970, right? In many cases, this is true. For example, the AMD 5870 has a stock clock of 850 mhz, while I'm able to get my 5850s to 870 mhz on stock voltage. Looking at the hard data, a 5870 has a 68 Gigatexels/second fill rate and a 153.6 GB/sec memory bandwidth. My 5850s are at 62.6 Gigatexels/sec and 153.6 GB/s (from GPUZ). At the same time, brand new, my cards were $150 cheaper. Pretty good argument for overclocking, no?
A word of warning: As much as overclocking is supported, it is not officially supported. This means that should you damage your card and send it in for a replacement, and the support tech staff is able to determine that you overclocked your card, then your warranty is void. OCing through software makes it very difficult for them to determine this, whereas a flashed BIOS makes it extremely easy.
Ok, so, regardless of why you want to overclock, let's get into the basics of it.
Core means the actual GPU core, where most of the magic happens. The speed, in mhz, that your GPU core is running at is going to greatly affect the texture and pixel fillrate performance, which is a huge bottleneck in gaming.
Memory (VRAM) is where textures are stored as well as rendered frames. There are plenty of performance benefits to having a higher memory speed, considering that pretty much everything you see on screen is at one time in the memory.
I ran some tests on FurMark, at 1920x1080, showing how both core speed and memory speed can affect performance. As you can see in the graph, the framerate went up as the memory speed increased, with barely any change from core speed. It is important to note that this particular test was run using 4xMSAA. I also did some tests at 0xMSAA in FurMark, and it showed that only core speed had an improvement. Basically I just want to point out that for optimal overclocking, you need to focus on both memory and core speeds.
Voltage is what gives you stability. As the core speed increases, it may need an increase in voltage to remain stable, much like in CPU overclocking. Most higher end GPUs allow voltage modification, however, not all GPUs allow this. In some cases you might be able to also modify the VRAM voltage, but this is fairly uncommon. If you can, then in much the same way as core voltage, it can help you achieve higher clocks.
VRM is the Voltage Regulator Module. This is what adjusts your input voltage to that going into your GPU. These are very prone to over heating when overclocking, especially if you increase your voltage.
The first things you'll need is a program to adjust GPU clocks. AMD offers Overdrive in the Catalyst Control Center, and many manufacturers offer their own tweaking programs, like Sapphire Trixx, MSI Afterburner, and EVGA Precision. Personally, I use Afterburner - with my Sapphire cards. It is probably the best all around program, and the only reason not to use it is if you have non-reference, non-MSI cards and want to adjust the voltage.
You will also want to download something to monitor your cards. Afterburner takes care of this, but you should also consider getting GPU-Z because it monitors more than just the core temperature. In most cases, you will also be able to see your VRAM and VRM temperatures as well. Ideally your temps won't surpass 80-90C at the absolute most. For my 5850s, I found I would get a hard system crash or lockup when VRM or VRAM hit around 120C, although my core temperature was still in an acceptable area - so keep in mind that you should check on those temps too.
Before you start, make sure that you do NOT have "apply overclock at startup" selected!
The basics of GPU overclocking are very similar to CPU overclocking. Personally, I recommend starting with Memory clock because it gives nice gains and often isn't affected by voltage - since usually you can only change core voltage. To overclock the memory, I like to start with 50mhz jumps, with 5 minutes of FurMark testing at 4xMSAA at full screen - also, let the cards stay heated up a fair bit rather than giving them a long cool down time between tests. You may want to set up your tests using the benchmark feature. Continue this until you get either a lock up, crash, artifacts, or the screen goes blank. Doing a hard reset on your PC isn't fun, but it shouldn't wreck anything. I usually find that ctrl+alt+del still works and you can reset from there.
When running your 5 minute benchmark tests, you will get a score at the end. As you increase the memory speed, you should see an improvement to the score. However, at some point even if you don't get a crash or lockup, you might notice your score either didn't increase, or worse yet, decreased. This is a vital thing to notice. The reason for this, as I understand it, is that GDDR5 memory - that is, the most common memory used for GPUs - is meant to be crash resistant. It does this by being able to resend data that failed the first time due to being unstable. In this way, if you are nearing the point of crashing, leading up to it the VRAM will need to resend data repeatedly, and therefore it will reduce performance compared to every piece of data being sent only once. Therefore, if you notice this occuring, slowly reduce your clocks by 5mhz until you realize the highest score.
Moving on to GPU core overclocking, the process is much the same. You can still start with 50 mhz jumps, but with the testing you should run at 0xMSAA in FurMark. Also try to keep temperatures high throughout the testing phase.
The most common issue of an unstable core is artifacting. This is when pixels essentially get stuck, and you'll notice multiple squares on screen that don't sync up with the image. At this point you will want to stop the test and will also have to reboot the PC. You have a choice here, either to reduce the clock or else increase the voltage. For 24/7 overclocks, I highly recommend reducing the clock and finding the highest stable clock on stock voltage. However, if you want to increase the voltage, I suggest doing it in 0.05V increments. Basically just increase the voltage and retest at the same clocks, and repeat until stable. It is also vitally important to watch all your temperatures, because as I mentioned before, it's possible that you crash because of heat and not instability.
Extra Info
There are, as always, a few other things to consider. FurMark isn't perfect in determining if your GPU is stable. I've passed fairly long sessions in FurMark, as well as a few games, before finally having an issue in one specific game. It didn't take long to realize that my GPU OC was to blame, and dropping my memory clock by only 5mhz made it nice and stable from there on out. So, actually playing games will be your final stress test.
If you run crossfire or SLI, there might be issues with instability. Generally it should be ok, but I've read about issues with crossfire that has to do with the switch between low power and high power, and only occurs when a custom voltage is set. It seems the way around this is to disable ULPS, which you can google for yourself.
Another area of problem is that sometimes after an overclock is applied, the graphics cards won't automatically change to low power state at idle, or else the idle state clocks are higher than they used to be. This is something that is at the mercy of people making the overclock programs, and the only way around this (and other) issues is to manually reflash your GPU BIOS. This is not a recommended practice, but I will just put here that if you have a very stable overclock, it is a handy thing to do because your GPU will essentially think that the overclock settings are it's default settings, so it behaves like a totally stock card. There are tools for changing and flashing the BIOS, and for more info check out techpowerup.com.
If you have concerns about your particular brand or model of graphics card, just google your card and key terms like "overclocking" "highest clocks" "stability" to find a variety of sources. I always advise learning as much as you can before doing something you don't quite understand, and causing damage.
A word of warning: As much as overclocking is supported, it is not officially supported. This means that should you damage your card and send it in for a replacement, and the support tech staff is able to determine that you overclocked your card, then your warranty is void. OCing through software makes it very difficult for them to determine this, whereas a flashed BIOS makes it extremely easy.
Ok, so, regardless of why you want to overclock, let's get into the basics of it.
Key Terms
Core means the actual GPU core, where most of the magic happens. The speed, in mhz, that your GPU core is running at is going to greatly affect the texture and pixel fillrate performance, which is a huge bottleneck in gaming.
 |
| I'm not paid for complete testing ;) |
I ran some tests on FurMark, at 1920x1080, showing how both core speed and memory speed can affect performance. As you can see in the graph, the framerate went up as the memory speed increased, with barely any change from core speed. It is important to note that this particular test was run using 4xMSAA. I also did some tests at 0xMSAA in FurMark, and it showed that only core speed had an improvement. Basically I just want to point out that for optimal overclocking, you need to focus on both memory and core speeds.
Voltage is what gives you stability. As the core speed increases, it may need an increase in voltage to remain stable, much like in CPU overclocking. Most higher end GPUs allow voltage modification, however, not all GPUs allow this. In some cases you might be able to also modify the VRAM voltage, but this is fairly uncommon. If you can, then in much the same way as core voltage, it can help you achieve higher clocks.
VRM is the Voltage Regulator Module. This is what adjusts your input voltage to that going into your GPU. These are very prone to over heating when overclocking, especially if you increase your voltage.
How To Overclock
 |
| MSI Afterburner |
 |
| GPU-Z Sensors |
Before you start, make sure that you do NOT have "apply overclock at startup" selected!
The basics of GPU overclocking are very similar to CPU overclocking. Personally, I recommend starting with Memory clock because it gives nice gains and often isn't affected by voltage - since usually you can only change core voltage. To overclock the memory, I like to start with 50mhz jumps, with 5 minutes of FurMark testing at 4xMSAA at full screen - also, let the cards stay heated up a fair bit rather than giving them a long cool down time between tests. You may want to set up your tests using the benchmark feature. Continue this until you get either a lock up, crash, artifacts, or the screen goes blank. Doing a hard reset on your PC isn't fun, but it shouldn't wreck anything. I usually find that ctrl+alt+del still works and you can reset from there.
 |
| FurMark stress test |
Moving on to GPU core overclocking, the process is much the same. You can still start with 50 mhz jumps, but with the testing you should run at 0xMSAA in FurMark. Also try to keep temperatures high throughout the testing phase.
The most common issue of an unstable core is artifacting. This is when pixels essentially get stuck, and you'll notice multiple squares on screen that don't sync up with the image. At this point you will want to stop the test and will also have to reboot the PC. You have a choice here, either to reduce the clock or else increase the voltage. For 24/7 overclocks, I highly recommend reducing the clock and finding the highest stable clock on stock voltage. However, if you want to increase the voltage, I suggest doing it in 0.05V increments. Basically just increase the voltage and retest at the same clocks, and repeat until stable. It is also vitally important to watch all your temperatures, because as I mentioned before, it's possible that you crash because of heat and not instability.
Extra Info
There are, as always, a few other things to consider. FurMark isn't perfect in determining if your GPU is stable. I've passed fairly long sessions in FurMark, as well as a few games, before finally having an issue in one specific game. It didn't take long to realize that my GPU OC was to blame, and dropping my memory clock by only 5mhz made it nice and stable from there on out. So, actually playing games will be your final stress test.
If you run crossfire or SLI, there might be issues with instability. Generally it should be ok, but I've read about issues with crossfire that has to do with the switch between low power and high power, and only occurs when a custom voltage is set. It seems the way around this is to disable ULPS, which you can google for yourself.
Another area of problem is that sometimes after an overclock is applied, the graphics cards won't automatically change to low power state at idle, or else the idle state clocks are higher than they used to be. This is something that is at the mercy of people making the overclock programs, and the only way around this (and other) issues is to manually reflash your GPU BIOS. This is not a recommended practice, but I will just put here that if you have a very stable overclock, it is a handy thing to do because your GPU will essentially think that the overclock settings are it's default settings, so it behaves like a totally stock card. There are tools for changing and flashing the BIOS, and for more info check out techpowerup.com.
If you have concerns about your particular brand or model of graphics card, just google your card and key terms like "overclocking" "highest clocks" "stability" to find a variety of sources. I always advise learning as much as you can before doing something you don't quite understand, and causing damage.
Sunday, 15 January 2012
What's in the Works
I'm in the middle of writing a guide on GPU overclocking. I figured it would be pretty quick and easy, but I want to add a few extra things to it, and that's going to take some time. I should have it out in the next few days.
In other news, I had a fairly busy weekend and didn't get the time to run more test on PCIe overclocking. I might just post what I already did a while back, and maybe make an update to it in the future with more testing results.
I've also just started Batman Arkham City, so I'll probably write a review on that in the next week or two. I've also gone back to my one-time favorite racing game, Race Driver: GRID, and I feel like after my NFS: The Run review, I might have to do a retro review on GRID because it really is one of the best racing experiences out there.
Also, in the more distant future, looking at making some guides on how to build a PC - from picking parts to physically building it. This one will take a while but it's something I've had up my sleeve for a while. I made slides for it, thinking about putting it on YouTube, but decided against it as it was just very dry material. I think a blog post is significantly more appropriate for it.
Stay tuned for lots of (hopefully) great posts!
Tuesday, 10 January 2012
How to Update Drivers and Install New GPUs
I notice that a lot of people on forums complain about bad performance after upgrading to Crossfire or SLI, and usually the fix is pretty simple. This also applies if you've bought a brand new graphics card or just want to get the next driver update.
Prerequisite:
-You need to have a motherboard that supports CF or SLI if you are going that route. For a new GPU upgrade, it won't matter as long as it has PCIe 2.0.
-You need a power supply that can handle the increased power draw from the new GPU. There will be a recommended amount via the manufacturer website.
So you get your new GPU home, what do you do?
Step 1
Download the latest drivers from Nvidia or AMD, depending on the GPUs you have.
Note for CF users: you must download the Crossfire Application Profile (CAP) separately from the main driver, at least for now. Nvidia drivers have it included.
Step 2 *Optional but recommended
Download Driver Fusion
Step 3
Uninstall your current drivers, and before rebooting run Driver Sweeper to totally clean out your drivers. Note that you only want to remove your "Display" drivers for AMD/Nvidia.
Step 4
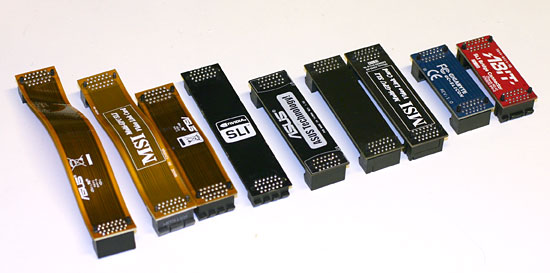
Turn off your PC, unplug or switch off the power supply, open the pc up, and plug in your new GPU. Make sure you connect the right PCIe 6 or 8 pin power connectors from your power supply. Also attach the CF or SLI bridge - this usually comes with the GPU and attaches near the L Bracket of the GPUs.
Step 5
Turn the PC back on. The resolution should be way off, like 600x800. Get into Windows and find that new driver you downloaded. Install it. For AMD Crossfire, install the CAP as well. Then, reboot.
Step 6
Verify that CF/SLI is working. Just go into the Catalyst Control Center/Nvidia Control Panel and check for the CF or SLI option, and make sure it is enabled.
Then go play games!
A note about installing drivers:
-You should always uninstall your old drivers before updating to new ones. I have occasionally had an issue when trying to simply install over top of old drivers that is always fixed by completely deleting the old one.
-For AMD users, you want to avoid installing the HydraVision at all costs. You also won't need the SDK install if that is available. I always advise you do a "custom" installation just to verify you are only installing what you need.
-Both AMD and Nvidia drivers come with audio drivers. Unless you are using the HDMI output with audio, you do not need this and I highly advise not installing it.
Prerequisite:
-You need to have a motherboard that supports CF or SLI if you are going that route. For a new GPU upgrade, it won't matter as long as it has PCIe 2.0.
-You need a power supply that can handle the increased power draw from the new GPU. There will be a recommended amount via the manufacturer website.
 |
| Crossfire 5850s, and a GT 240 for PhysX |
Step 1
Download the latest drivers from Nvidia or AMD, depending on the GPUs you have.
Note for CF users: you must download the Crossfire Application Profile (CAP) separately from the main driver, at least for now. Nvidia drivers have it included.
Step 2 *Optional but recommended
Download Driver Fusion
Step 3
Uninstall your current drivers, and before rebooting run Driver Sweeper to totally clean out your drivers. Note that you only want to remove your "Display" drivers for AMD/Nvidia.
Step 4
Turn off your PC, unplug or switch off the power supply, open the pc up, and plug in your new GPU. Make sure you connect the right PCIe 6 or 8 pin power connectors from your power supply. Also attach the CF or SLI bridge - this usually comes with the GPU and attaches near the L Bracket of the GPUs.
Step 5
Turn the PC back on. The resolution should be way off, like 600x800. Get into Windows and find that new driver you downloaded. Install it. For AMD Crossfire, install the CAP as well. Then, reboot.
Step 6
Verify that CF/SLI is working. Just go into the Catalyst Control Center/Nvidia Control Panel and check for the CF or SLI option, and make sure it is enabled.
Then go play games!
A note about installing drivers:
-You should always uninstall your old drivers before updating to new ones. I have occasionally had an issue when trying to simply install over top of old drivers that is always fixed by completely deleting the old one.
-For AMD users, you want to avoid installing the HydraVision at all costs. You also won't need the SDK install if that is available. I always advise you do a "custom" installation just to verify you are only installing what you need.
-Both AMD and Nvidia drivers come with audio drivers. Unless you are using the HDMI output with audio, you do not need this and I highly advise not installing it.
Monday, 9 January 2012
Dedicated PhysX Acceleration with AMD Radeon
PhysX is a name often thrown about when comparing AMD to Nvidia GPUs. It is a proprietary feature that Nvidia bought many years ago, and they only allow it to be run on their own GPUs. Moreover, they have got into the habit of disabling the possibility of using PhysX when a non Nvidia GPU is detected.
What is PhysX? Well, simply put, it is an advanced physics engine. While I'm sure there is a licensing fee, pretty much any developer can get ahold of the SDK and use the advanced physics that PhysX provides. This includes extremely realistic cloth and water effects, among other things. Unfortunately, the list of games that run accelerated PhysX is fairly small. Note that there are games which use PhysX as a generic physics engine, like Bullet or Havok, and do not use the accelerated portion.
Nvidia's PhysX has the ability to be run off a dedicated card. This means you might have a GTX 560 Ti as your graphics card, and perhaps an older 8800GT or a GTS 250 that you can put into your motherboard, which will only be used to do PhysX. In theory this should work just as well if you run an AMD Radeon as your primary card, as long as you have a capable Nvidia card for the dedicated PhysX card.
And thanks to a wonderful person who goes by the name GenL, you can!
The GenL patch V1.05ff supports the latest PhysX software (version 9.11.1107) and usually the most recent WQHL Nvidia drivers as well (for sure up to 285.62).
First of all, your AntiVirus will probably give a false positive about it being a virus. This is because it changes registry values, but I assure you that in all the time I've used it, there have been no problems. You will therefore need to disable your antivirus for the installation.
Simply install your dedicated Nvidia card, install the Nvidia drivers, and install the latest PhysX software. Then, run the GenL patch and reboot your PC. After that you can check using FluidMark to see if you are getting GPU acceleration.
There is a couple more things to note. Any program that runs PhysX hardware acceleration will have certain files in it pertaining to PhysX. Things like "PhysXCore.dll" and "PhysXLoader.dll". Occasionally you will need to over write these with the same files out of your "Program Files (x86)\NVIDIA Corporation\PhysX\(newest)" folder - but be sure to back them up first! Some games work without doing this, and some like Batman Arkham City you actually only need to remove the "PhysXDevice.dll" file and it works great. So check it out and google what to do if you are having issues. The former link is a great resource.
FYI: I use a GT 240 in a PCIe 1.0 4x lane on my Asus P7P55D Pro motherboard, and it works great! It can't quite max itself out (~82% max usage) due to a bandwidth issue, but it does the job! You don't need a powerful GPU for this.
Sunday, 8 January 2012
Beginner's Overclocking Guide - Part 4
Knowing What to Change
This is probably the hardest part of overclocking. After you increase your speed and run a test, where do you make changes if it failed?
The first rule is to make sure you're changing as few variables at a time as possible. By this, as I've mentioned before, I mean overclock your CPU independently from your RAM or anything else. Focus on the CPU and then you'll know what to change. The first course of action is to increase the Vcore. I like to use the +/- keys for this, and generally give it "two increases". After that test again. If it fails, you can either do Vcore again or increase the VTT by a similar amount. If you are using an unlocked CPU, you mostly only need to focus on Vcore.
In the BIOS, the Vcore is usually set to Auto by default. To a certain extent, your motherboard and CPU will be able to automatically increase the voltage to your CPU as needed, however, I discourage this practice. As far as I know, it essentially works by reading values off a table and picking what seems to be the right one - in no way does it adjust "on the fly" as required. It's possible that some top end motherboards can do so, but either way you will achieve greater stability by manually adjusting the voltage as required. You can usually set the voltage to "offset" or "manual", where manual shows you the full voltage reading and offset merely shows the amount above or below the stock voltage you are at. Manual is my preference.
If you are at a fairly reasonably high overclock, like 4+ghz or 4.5ghz on a Sandy Bridge, you're probably going to hit a wall. What this means is that as you increase the CPU clock, it will lose efficiency. Eventually a small increase in speed will require a large increase in voltage. If you notice as you go that you start requiring more and more voltage increases to get stable, you are definitely nearing the wall and should consider whether you are happy with your current overclock. I've mentioned before that CPUs do have a voltage limit to them, particularly if you want it to last a while.
You also need to watch your temperature. Higher voltages will produce higher temperatures, and high temps are a detriment to CPU stability and longevity. If you are heating up at an abnormal rate, you might need to check that your CPU cooler is attached properly. If it is, and it's clean, and you have good case airflow, then you reached the limit of that cooler and will either need to just live with the clock you've reached, or buy a better one.
If you are pushing a very high overclock - perhaps for benchmarking - and are not terribly concerned by the voltage and/or temps, then you might find other factors than voltage are hurting your stability. You may need to disable EIST/Speed Step, C States, Cool N Quite (AMD), and other things. If there is an option you are unfamiliar with, it is a good idea to check your motherboard manual and to google for information on it.
Info:
Example of Intel's Tech Specs (i5 750) - View section 7.4 for the VID table, or 7.8 for the absolute max voltage the CPU can handle.
Intel Tech Support - Search your CPU here, and select "Documentation and Guides". Then go to "General Product Information" and select "Technical Documentation".
AMD Tech Support - Search your CPU here, and select "Technical Documents". The select the "Desktop Processor Power and Thermal Data Sheet" - note: this doesn't appear for the FX series at this time.
Setting the RAM
Finally, I hope, you'll have reached a stable CPU overclock. I also hope that you are using a BCLK that will allow you to set your RAM to it's rated speeds. Ideally, you will just select the right multiplier to get the proper speed out of it. You also need to set the voltage to the appropriate amount - many RAM kits are 1.5V but for example I use RAM rated for 1.65V. Just verify your DRAM voltage is right.
If you have the speed and voltage right, there is still one more thing to adjust - the timings. If you see a RAM rating, it is usually something like "1600mhz 1.5V CL9". The CL9 means the CAS Latency = 9. The 9 refers to how many clock cycles it can take. There are, however, many more timings than just CL9. Usually, CL9 actually means 9-9-9-27 which are the 4 most important timings. The first 3 timings are almost always identical, like the former example. They could also be 8-8-8-24, for example. The 4th value is usually just the first 3 added together.
For a lot more detail on that, this is a pretty good article:
Understanding RAM Timings
Suffice it to say that as you SPEED goes up, your TIMINGS do as well. Essentially, any given RAM will run at a particular speed for a particular timing. So if you have 1400mhz RAM at CL7, you might be able to run it at 1600mhz CL8 or 1800mhz CL9. This is not a guarantee, but it's very possible if it is good RAM. Also increasing the voltage can help the RAM run at higher speeds.
Ideally, you will not have to make the RAM run at too high of a speed, but if your CPU overclock gives a solid 1600mhz possibility for the RAM, you might wish to try it by either increasing or decreasing the timings based on what they are rated for at stock speeds. If you can't find your stock settings, check CPU-Z under the Memory tab. It will list JEDEC specs, which are universal, but if it has XMP specs then those are specific to your RAM.
XMP means "Extreme Memory Profile". Technically, anything over 1333mhz is "overclocked". XMP is fine in that it does set your RAM to it's rated speed, but the problem is that sometimes it will mess with your BCLK/FSB. You may want to use it to view the recommended settings, but once you found your CPU's OC settings, do not accidentally undo it all by setting the XMP (of course, you can choose to not save the changes if you want).
After any changes, again, make sure to test. You'll want to use a maximum memory usage test in Intel Burn Test, or even run Memtest86+ or a long Blend test in Prime95.
Beginner's Overclocking Guide - Part 3
Testing
The first step to overclocking is to download appropriate apps to test your settings. There's a large variety of programs available, so I'm just going to list a few here.
First of all you're going to need system health monitoring programs. You can try:
HWMonitor
CPU-Z
Real Temp
Speed Fan
Secondly, you're going to need some stress tests. My favorite is IBT, but here's a few options:
Intel Burn Test
Prime95 32bit / Prime95 64bit
OCCT
Memtest86+ Bootable CD
Testing is actually fairly simple. I'd suggest running HWMonitor and Real Temp at the same time, to make sure you have accurate sensor readings. Leaving these programs open to monitor temperatures, run a stress test. Generally speaking, the more RAM you use, the more stability will depend on RAM. Specifically with IBT, you can set a low RAM usage (standard) with a very high amount of passes (20-30) to check almost exclusively CPU stability. If CPU passes, then it is recommended to do at least 10 passes on Maximum stress level to make sure everything is good.
Prime95 is much less sensitive to errors than IBT, but it is still a good test to run. However, it takes quite a bit longer. It would be a good idea to run it overnight, as it is typically recommended to get an 8 hour test without errors to be almost guaranteed stable. This, obviously, should be the last test you run as it is the most time consuming.
With any CPU, there is a thermal limit you shouldn't go too far over. Typical for Intel CPUs is 72C. AMD CPUs are a little different, but overall if you keep a CPU under 70C you should be ok. If stress tests are below 80C, it might be a little bit of a risk but you can still call that acceptable because under normal loads like in gaming and encoding videos, the temperature should be lower - just make sure you verify that.
Overclocking
Ok, so you should know understand most of the important options in your BIOS, how they are related, and how to test an overclock once you make changes. But what changes should you make? This will depend highly on your system, so I can only give some more general advice. Remember that OCing is more of an experience than anything. Take your time with it, don't jump too high very quickly, and always, always test.
If you have an unlocked CPU, this becomes rather simple. First and foremost, set your RAM to manufacturer specifications and test it - without overclocking the CPU. This is important to make sure your RAM is ok. Once you've done that (let's say 10 IBT passes at Max usage - or at least 2 passes of Memtest86+) you can start increasing your CPU multiplier. I would suggest not making more than 400mhz jumps above stock up to 4ghz, and not more than 100mhz after that. Test after each change.
If you have a locked CPU and need to start increasing the FSB/BCLK, overclocking gets much more complicated. The first thing to consider, which I mentioned previously, is that the speed of your RAM is affected by the BCLK. This of course poses a problem, and is one reason why overclockers like to buy fast RAM (1600+ MHz). For now, the RAM will have to be set to a lower than rated speed to ensure stability, while you overclock the CPU. Often, 200 BCLK or less is easily acheivable, so consider what values you can use to eventually get your RAM to 1200, 1400, 1600, or higher speed (if rated for that). We'll worry about actually hitting those values later. Much like for the unlocked CPUs, you don't want to take huge steps in speed increase. Guide Part 4
The first step to overclocking is to download appropriate apps to test your settings. There's a large variety of programs available, so I'm just going to list a few here.
First of all you're going to need system health monitoring programs. You can try:
HWMonitor
CPU-Z
Real Temp
Speed Fan
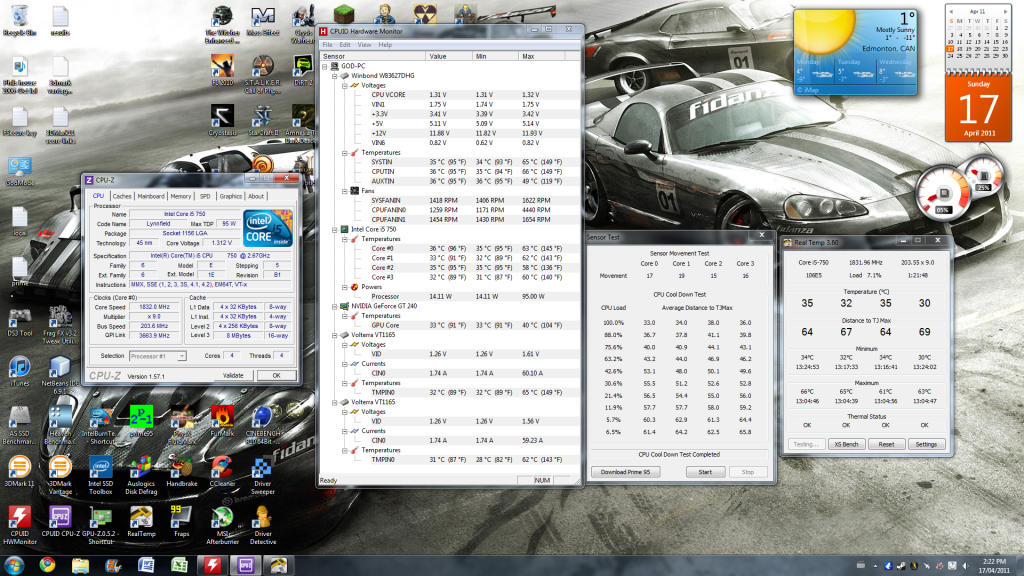 |
| GPUZ, HWMonitor, and Real Temp |
Secondly, you're going to need some stress tests. My favorite is IBT, but here's a few options:
Intel Burn Test
Prime95 32bit / Prime95 64bit
OCCT
Memtest86+ Bootable CD
Testing is actually fairly simple. I'd suggest running HWMonitor and Real Temp at the same time, to make sure you have accurate sensor readings. Leaving these programs open to monitor temperatures, run a stress test. Generally speaking, the more RAM you use, the more stability will depend on RAM. Specifically with IBT, you can set a low RAM usage (standard) with a very high amount of passes (20-30) to check almost exclusively CPU stability. If CPU passes, then it is recommended to do at least 10 passes on Maximum stress level to make sure everything is good.
Prime95 is much less sensitive to errors than IBT, but it is still a good test to run. However, it takes quite a bit longer. It would be a good idea to run it overnight, as it is typically recommended to get an 8 hour test without errors to be almost guaranteed stable. This, obviously, should be the last test you run as it is the most time consuming.
With any CPU, there is a thermal limit you shouldn't go too far over. Typical for Intel CPUs is 72C. AMD CPUs are a little different, but overall if you keep a CPU under 70C you should be ok. If stress tests are below 80C, it might be a little bit of a risk but you can still call that acceptable because under normal loads like in gaming and encoding videos, the temperature should be lower - just make sure you verify that.
Overclocking
Ok, so you should know understand most of the important options in your BIOS, how they are related, and how to test an overclock once you make changes. But what changes should you make? This will depend highly on your system, so I can only give some more general advice. Remember that OCing is more of an experience than anything. Take your time with it, don't jump too high very quickly, and always, always test.
If you have an unlocked CPU, this becomes rather simple. First and foremost, set your RAM to manufacturer specifications and test it - without overclocking the CPU. This is important to make sure your RAM is ok. Once you've done that (let's say 10 IBT passes at Max usage - or at least 2 passes of Memtest86+) you can start increasing your CPU multiplier. I would suggest not making more than 400mhz jumps above stock up to 4ghz, and not more than 100mhz after that. Test after each change.
If you have a locked CPU and need to start increasing the FSB/BCLK, overclocking gets much more complicated. The first thing to consider, which I mentioned previously, is that the speed of your RAM is affected by the BCLK. This of course poses a problem, and is one reason why overclockers like to buy fast RAM (1600+ MHz). For now, the RAM will have to be set to a lower than rated speed to ensure stability, while you overclock the CPU. Often, 200 BCLK or less is easily acheivable, so consider what values you can use to eventually get your RAM to 1200, 1400, 1600, or higher speed (if rated for that). We'll worry about actually hitting those values later. Much like for the unlocked CPUs, you don't want to take huge steps in speed increase. Guide Part 4
Beginner's Overclocking Guide - Part 2
Some Terminology
There are a few things you need to know first. This can be rather tedious and, for the beginner, daunting. I assure that no matter how complicated it looks now, once you enter the BIOS and have a look for yourself, and start to change some values, it should all start making a lot more sense.
Voltages
The first thing I'll be addressing is Vcore. This is the CPU core voltage, and is one of the biggest influences on CPU stability. All CPUs have manufacturer specifications on what the highest Vcore the chip is rated to handle, so make sure to check the documentation online before you start. As a general rule for Intel CPUs, 1.4V is the max you want to go, but some high end chips are ok up to 1.5V.
Secondly, Intel has what is sometimes called IMC voltage (Integrated Memory Controller), other times called QPI (QuickPath Interconnect), and yet other times VTT. On AMD rigs, you have a Northbridge Voltage - the NB is pretty similar to the IMC (and in a way the QPI) in that they both handle a lot of information flowing into and out of the CPU and back and forth to other components on the motherboard. Increasing this voltage along with Vcore will help stability. On Intel rigs, I generally keep this around 0.1 to 0.2V below the Vcore value, but that is not a "hard and fast" rule, just a preference. There is one hard rule for IMC/VTT/QPI voltage, though: it must be within 0.5V of your DRAM voltage.
DRAM Voltage is directly related to your RAM. RAM should always be set to the recommended manufacturer speeds. For example, you might have bought a 2x2gb 1333mhz CL8 1.5V RAM set. The 1.5V designates the DRAM voltage needed for that speed (1333mhz) and timings (CL8). I'll explain more on this later in the nitty gritty of OCing.
There are a few other voltages you can probably tweak. In the example picture, that is my BIOS. PLL means "phase-locked loop", and PCH "platform controller hub". The PCH refers to the "south bridge" which is where many information sources have to go through - for example most PCIe 1x slots will go through there as well as USB and SATA hubs. The PLL voltage rarely has to be changed, maybe 0.1V increase at high base clocks. Same goes for the PCH - although in my case I have a PCIe 4x slot that runs through it, with a GT 240 installed to run PhysX. I found that by increasing my PCH voltage to 1.15 helpled stabilize the GPU.
Clocks
Base Clock (Intel) and Front Side Bus (AMD) are quite similar. The BCLK is what all other speeds are multiplied from to get their final speed. So your CPU might run at 22x multiplier - this means 22xBclk. RAM, too, is multiplied by the BCLK. Many Intel CPUs have a 133mhz base clock - so 22x133=2.9ghz. 10x133=1333mhz RAM. The QPI is also a multiple of the base clock. Front Side Bus, or FSB, works in much the same way although usually they use ratios instead of multipliers. This can be a little confusing, but when I say "change the multiplier" consider this to also mean the ratio if you have an AMD rig.
The PCIe clock is a bit special. I have a first gen "i" core - an i5 750 - in which the PCIe bus is unrelated to the base clock. However, as I understand it, this is not the case for the current Sandy Bridge intel cores like the i5 2500k. I have mentioned PCIe clock before in a previous blog post, but suffice it to say you shouldn't touch this right now. I will delve into this deeper at a later time (links will be provided at the end).
CPU Frequency is, of course, the speed your CPU runs and this is the value you are trying to increase. Only a few years ago, 4ghz was considered "the top" and going beyond that was "insane". On any current generation CPU, 4ghz is actually fairly easy to achieve. That isn't to say all CPUs will make that number, though - bear in mind that all hardware is slightly different and has different potential for overclocking. You need to be slow and cautious to get the most out of your hardware.
Feature Terms
There's a lot of features present in most BIOSes. Many of them you don't need to worry about, some you do. Some are completely optional or unrelated to overclocking. For example, the ASUS RoG series of motherboards (extremely top end) have all sorts of features you can access - like being able to overclock from a smart phone. I'm not going to touch on these. Instead I'll focus on what is primarily related to CPU stability when overclocking.
On the previous picture, you'll see one very important term - Load Line Calibration (or LLC). What this means, is that the motherboard will try to counter act the natural drop in Vcore once a load is applied to the CPU. This drop actually has a term - called VDroop - and it is in fact a specification made by Intel. I'm not sure if AMD has this or not. One important thing about VDroop is that when an Intel CPU is running with Turbo Boost, it can modify it's multiplier on the fly based on how many cores are needed. If only 2 cores out of 4 are required, the CPU will run at a higher frequency. This can also require a higher voltage, so with LLC off (VDroop on) the voltage will naturally be a bit higher because there is a smaller load (2 cores aren't as power demanding as 4). However, when overclocking, it is common to disable Turbo Boost. In this case, enabling LLC can be beneficial to getting a stable overclock. It's not required unless going for close to or above 4ghz. There is a note of caution here, technically speaking when the Vcore fluctuates and the motherboard tries to compensate, it can for just a fraction of a second apply an overvoltage which may damage your CPU. This is extremely unlikely, but remember that the quality of your motherboard plays a huge factor in this.
CPU Ratio I have already hit on, but I want to mention a couple things. Most CPUs can go as low as 9x multiplier. The highest they can go will depend entirely on the CPU. My i5 750 tops out at 21x, the i5 760 at 22x. Both AMD and Intel have a series of CPUs that are "unlocked". From AMD, they are the Black Edition (BE) CPUs and from Intel they are the "K" series (2500k). What unlocked means, is that the multiplier is unlocked and can be raised to a very high number - like 60+. This makes overclocking significantly easier as you don't need to worry much about changing the base clock, which also means no worries about it interfering with your RAM and QPI.
DRAM Frequency is set as a multiplier of the BCLK. Generally on Intel, you only have 3 options: 10x, 8x, 6x. This means that to hit your RAM's rated speeds can require a specific BCLK. If you need to change the BCLK, keep this in mind. As you see in the image, my BCLK is at 200 which makes it really nice to hit my 1600mhz RAM speed with the 8x multiplier. This does limit my CPU OC options, though, to 200mhz increments. I have it at 20x (4.0ghz) and other options are 4.2ghz, 3.8ghz, 3.6ghz, etc. I'll delve into RAM OCing at another time, but for now it's just important to know how BCLK will affect RAM speed. With AMD CPUs, you have an FSB:DRAM ratio which acts in much the same way.
The QPI frequency isn't something that needs to be worried about unless you hit an extremely high BCLK (over 200). Generally you want this fast because it will help speed up all data access on the motherboard. On AMD boards, I believe this is often the Hyper Transport speed and it also helps to overclock that.
Both AMD and Intel have features that can change the CPU multiplier automatically. The first feature is a turbo feature, which increases the CPU frequency automatically when less cores are being used in order to speed up single threaded apps. At least for Intel CPUs, it is possible to overclock the base clock and gain a higher turbo-enabled overclock - however there is a limit. I personally hit a wall at 177 base clock, which still delivered a very high turbo clock. Of course when all 4 cores are in use, the overall frequency is lower than doing a straight 4ghz for example.
The other multiplier changing feature they have is EIST/Speed Step from Intel and Cool'N'Quiet from AMD. In both cases, these features are used to reduce CPU frequency and voltage in order to save power at idle. Generally it is good to have these enabled, but when overclocking to a high frequency that starts to push the limits of your CPU, you may have to disable these functions in order to achieve a stable OC.
CPUs also have a feature called C States, which are related to EIST. The C States are what engage to turn off cores at idle. They are necessary for Turbo Boost and EIST to function properly. There are also different levels of C States, with the higher number (C6) being the most advanced stage of idle mode. Usually these can and should remain active, but you may wish to run C3 instead of C6.
There is one feature that is exclusive to AMD, and it is "Core Unlocker". Essentially, many of the dual and tri-core CPUs from AMD are actually just quad cores with some of the cores disabled. Sometimes this is because they are unstable, but often it is merely done so that they actually have some cheaper dual cores to sell. In either case, many motherboards allow you to unlock cores. If you do this, be sure to test the unlocked cores before getting on with any overclocking. Guide Part 3
There are a few things you need to know first. This can be rather tedious and, for the beginner, daunting. I assure that no matter how complicated it looks now, once you enter the BIOS and have a look for yourself, and start to change some values, it should all start making a lot more sense.
 |
| Example of BIOS voltages |
Voltages
The first thing I'll be addressing is Vcore. This is the CPU core voltage, and is one of the biggest influences on CPU stability. All CPUs have manufacturer specifications on what the highest Vcore the chip is rated to handle, so make sure to check the documentation online before you start. As a general rule for Intel CPUs, 1.4V is the max you want to go, but some high end chips are ok up to 1.5V.
Secondly, Intel has what is sometimes called IMC voltage (Integrated Memory Controller), other times called QPI (QuickPath Interconnect), and yet other times VTT. On AMD rigs, you have a Northbridge Voltage - the NB is pretty similar to the IMC (and in a way the QPI) in that they both handle a lot of information flowing into and out of the CPU and back and forth to other components on the motherboard. Increasing this voltage along with Vcore will help stability. On Intel rigs, I generally keep this around 0.1 to 0.2V below the Vcore value, but that is not a "hard and fast" rule, just a preference. There is one hard rule for IMC/VTT/QPI voltage, though: it must be within 0.5V of your DRAM voltage.
DRAM Voltage is directly related to your RAM. RAM should always be set to the recommended manufacturer speeds. For example, you might have bought a 2x2gb 1333mhz CL8 1.5V RAM set. The 1.5V designates the DRAM voltage needed for that speed (1333mhz) and timings (CL8). I'll explain more on this later in the nitty gritty of OCing.
There are a few other voltages you can probably tweak. In the example picture, that is my BIOS. PLL means "phase-locked loop", and PCH "platform controller hub". The PCH refers to the "south bridge" which is where many information sources have to go through - for example most PCIe 1x slots will go through there as well as USB and SATA hubs. The PLL voltage rarely has to be changed, maybe 0.1V increase at high base clocks. Same goes for the PCH - although in my case I have a PCIe 4x slot that runs through it, with a GT 240 installed to run PhysX. I found that by increasing my PCH voltage to 1.15 helpled stabilize the GPU.
Clocks
Base Clock (Intel) and Front Side Bus (AMD) are quite similar. The BCLK is what all other speeds are multiplied from to get their final speed. So your CPU might run at 22x multiplier - this means 22xBclk. RAM, too, is multiplied by the BCLK. Many Intel CPUs have a 133mhz base clock - so 22x133=2.9ghz. 10x133=1333mhz RAM. The QPI is also a multiple of the base clock. Front Side Bus, or FSB, works in much the same way although usually they use ratios instead of multipliers. This can be a little confusing, but when I say "change the multiplier" consider this to also mean the ratio if you have an AMD rig.
The PCIe clock is a bit special. I have a first gen "i" core - an i5 750 - in which the PCIe bus is unrelated to the base clock. However, as I understand it, this is not the case for the current Sandy Bridge intel cores like the i5 2500k. I have mentioned PCIe clock before in a previous blog post, but suffice it to say you shouldn't touch this right now. I will delve into this deeper at a later time (links will be provided at the end).
CPU Frequency is, of course, the speed your CPU runs and this is the value you are trying to increase. Only a few years ago, 4ghz was considered "the top" and going beyond that was "insane". On any current generation CPU, 4ghz is actually fairly easy to achieve. That isn't to say all CPUs will make that number, though - bear in mind that all hardware is slightly different and has different potential for overclocking. You need to be slow and cautious to get the most out of your hardware.
Feature Terms
There's a lot of features present in most BIOSes. Many of them you don't need to worry about, some you do. Some are completely optional or unrelated to overclocking. For example, the ASUS RoG series of motherboards (extremely top end) have all sorts of features you can access - like being able to overclock from a smart phone. I'm not going to touch on these. Instead I'll focus on what is primarily related to CPU stability when overclocking.
 |
| What not to do with your PCIe frequency |
CPU Ratio I have already hit on, but I want to mention a couple things. Most CPUs can go as low as 9x multiplier. The highest they can go will depend entirely on the CPU. My i5 750 tops out at 21x, the i5 760 at 22x. Both AMD and Intel have a series of CPUs that are "unlocked". From AMD, they are the Black Edition (BE) CPUs and from Intel they are the "K" series (2500k). What unlocked means, is that the multiplier is unlocked and can be raised to a very high number - like 60+. This makes overclocking significantly easier as you don't need to worry much about changing the base clock, which also means no worries about it interfering with your RAM and QPI.
DRAM Frequency is set as a multiplier of the BCLK. Generally on Intel, you only have 3 options: 10x, 8x, 6x. This means that to hit your RAM's rated speeds can require a specific BCLK. If you need to change the BCLK, keep this in mind. As you see in the image, my BCLK is at 200 which makes it really nice to hit my 1600mhz RAM speed with the 8x multiplier. This does limit my CPU OC options, though, to 200mhz increments. I have it at 20x (4.0ghz) and other options are 4.2ghz, 3.8ghz, 3.6ghz, etc. I'll delve into RAM OCing at another time, but for now it's just important to know how BCLK will affect RAM speed. With AMD CPUs, you have an FSB:DRAM ratio which acts in much the same way.
The QPI frequency isn't something that needs to be worried about unless you hit an extremely high BCLK (over 200). Generally you want this fast because it will help speed up all data access on the motherboard. On AMD boards, I believe this is often the Hyper Transport speed and it also helps to overclock that.
Both AMD and Intel have features that can change the CPU multiplier automatically. The first feature is a turbo feature, which increases the CPU frequency automatically when less cores are being used in order to speed up single threaded apps. At least for Intel CPUs, it is possible to overclock the base clock and gain a higher turbo-enabled overclock - however there is a limit. I personally hit a wall at 177 base clock, which still delivered a very high turbo clock. Of course when all 4 cores are in use, the overall frequency is lower than doing a straight 4ghz for example.
The other multiplier changing feature they have is EIST/Speed Step from Intel and Cool'N'Quiet from AMD. In both cases, these features are used to reduce CPU frequency and voltage in order to save power at idle. Generally it is good to have these enabled, but when overclocking to a high frequency that starts to push the limits of your CPU, you may have to disable these functions in order to achieve a stable OC.
CPUs also have a feature called C States, which are related to EIST. The C States are what engage to turn off cores at idle. They are necessary for Turbo Boost and EIST to function properly. There are also different levels of C States, with the higher number (C6) being the most advanced stage of idle mode. Usually these can and should remain active, but you may wish to run C3 instead of C6.
There is one feature that is exclusive to AMD, and it is "Core Unlocker". Essentially, many of the dual and tri-core CPUs from AMD are actually just quad cores with some of the cores disabled. Sometimes this is because they are unstable, but often it is merely done so that they actually have some cheaper dual cores to sell. In either case, many motherboards allow you to unlock cores. If you do this, be sure to test the unlocked cores before getting on with any overclocking. Guide Part 3
Beginner's Overclocking Guide - Part 1
Preface
As I already wrote about, a stable PC is very important. However, today I'm going to try and teach the basics behind how to destabilize your PC with faster clocks - and then, hopefully, get it stable again with safe voltage and temperatures.
There are many reasons to overclock, but for the current generation of CPUs it's more a matter of "why not?" than "why should I?" I'm not here to convince anyone to overclock, but if it's something you're interested in then I hope I can help you understand it a little better and get you on your way. Overclocking can be tedious, but also fun once you get the hang of it and achieve a successful overclock.
There are some differences between how Intel and AMD CPUs are overclocked. A lot of it, though, is nomenclature. Most of my experience is with Intel chips, so that is what I'm going to focus on. However, there are some terms that are, for all intents and purposes, interchangeable with what you see on AMD chips. More on that coming up.
One more thing, for the absolute beginner. If you are totally unfamiliar with overclocking, this is the gist of it: You increase frequencies and/or multipliers or ratios in order to increase the speed at which your hardware runs above and beyond the stock speeds. Once you reach a certain speed, the default voltages are no longer enough to keep it running stable so you need to increase them. The question about how much and which ones are what I hope to help answer by the end of this guide.
Prerequisites
There's a few things that you absolutely need before you can consider overclocking. The first is a motherboard that supports overclocking. Unfortunately, if you own any "big name" PCs like Dell, Gateway, HP, etc., you will not have the option to overclock. Some PC makers like Alienware and CyberPower will use motherboards like Asus, Gigabyte, and MSI which generally do allow overclocking. Just go into your BIOS at startup (typically DEL key during the POST/boot) and see what options you have.
The second thing you need, and this is very important, is good cooling. The case itself needs to have a decent amount of air flow. Typically most "aftermarket" cases will be sufficient, but if you upgraded the motherboard using one of the smaller HP/Dell/etc towers, you may need to make some changes. I've seen many that only have 1 exhaust fan, on the bottom. Ideally you would have at least 1 intake and 1 exhaust. On top of good case cooling, you also will need good CPU cooling. Typically the stock cooler that comes with a CPU is not going to cut it for overclocking. You might get a very small performance bump out of it, but it will quickly run out of thermal headroom. Ideally you need an aftermarket tower cooler, even a cheaper one like the Hyper 212 Plus. Guide Part 2
Wednesday, 4 January 2012
AMD Radeon 7970
AMD Radeon is releasing it's latest and greatest GPU on January 9, 2012. There is already many reviews out for it, and it's worth checking out more than one to get a good sense of how fast and powerful this $550 card really is.
But, in my humble opinion, this is probably the best review I've seen yet. It goes over the architecture in extreme detail but also makes it understandable, and then in the benchmarking they are extremely thorough. They are using a new way to represent GPU power that I have not seen anywhere else, where they actually record frame render times, which gives a good indication of any stutters you might experience in a game, even if you have a high average framerate.
Read it here: Tech Report's 7970 Review
Update: Jan 9/2012
Another awesome review featuring a ton of games as well as Crossfire performance:
TechPowerUp 7970 Crossfire Review
Monday, 2 January 2012
The Importance of a Stable PC
I'll admit it, I overclock my PC. My CPU, an Intel i5 750, is running at 4013mhz while my GPUs are overclocked around 20%. I even have my PCIe speed overclocked a little - this is something I will touch on later as I did some benchmarks on that.
So, overclocking is a topic all unto itself, but once you've got your hardware at speeds you like it is extremely important to test it. When I first overclocked I ran 8+ hour Prime95 stress tests on the CPU and RAM. I recall one time it developed an error after 5 hours, so I bumped the voltage a single increment and then it passed the full overnight test.
However, lately I'm less interested is spending a weekend perfecting the overclock and leaving my PC running full tilt overnight. There is a type of stress test called LinX which is very sensitive to instability. It also causes more heat to develop than Prime95. I use the Intel Burn Test for this.
I find IBT will generally find an error in the CPU at low RAM usage settings after around 30 runs. However, it is a little harder to find a RAM issue (or something else). The generally accepted practice would be to max out the RAM usage with IBT. This, however, takes a long time. Roughly 5 minutes per pass for me with 8 gigs.
Another option for testing RAM is a test called Memtest86+. It also takes a while but it will fully work your RAM. I use it rarely, but it is good to have.
Anyway, what prompted this blog is Battlefield 3. I've put hundreds of hours into games at my current overclock settings with relatively no issues. For example, Skyrim, I've logged just over 100 hours and the only crashes were the well known "Crash To Desktop" which I was able to fix with some user created mods. BF3, on the other hand, either CTDs or else it Blue Screens altogether. It usually doesn't happen until after a few hours of gaming, either.
I know my temps are fine, so the culprit is either software or hardware. It's easy enough to blame the software, but especially when overclocking, it is very important to be absolutely sure you can rule out hardware. So, I ran 5 passes of IBT at max RAM usage and, lo and behold, I got an error on the 3rd pass. I then ran 20 passes at low RAM usage and it passed fine. My fix, then, was to go into my BIOS in increase my RAM voltage a tick. My RAM is rated for 1600mhz CL8 at 1.65V, but the thing is when you load up 4 sticks of RAM it takes more juice overall. Possibly increasing the IMC voltage would help, but instead I set DRAM to 1.67V. So far so good, but if I get any more issues and am able to fix it, I'll write an update.
Subscribe to:
Posts (Atom)